

Tutorial 1 - STEP 1
Create a component
Now let's start with VIGO6 - What you need to build
In this first tutorial, we will show you some key ideas of VIGO6 that will help you build your first control component.
The tutorial switch between theory and hands-on exercises with "HOW-TO" videos as a help.
THE Control logic
SPECIFICATION
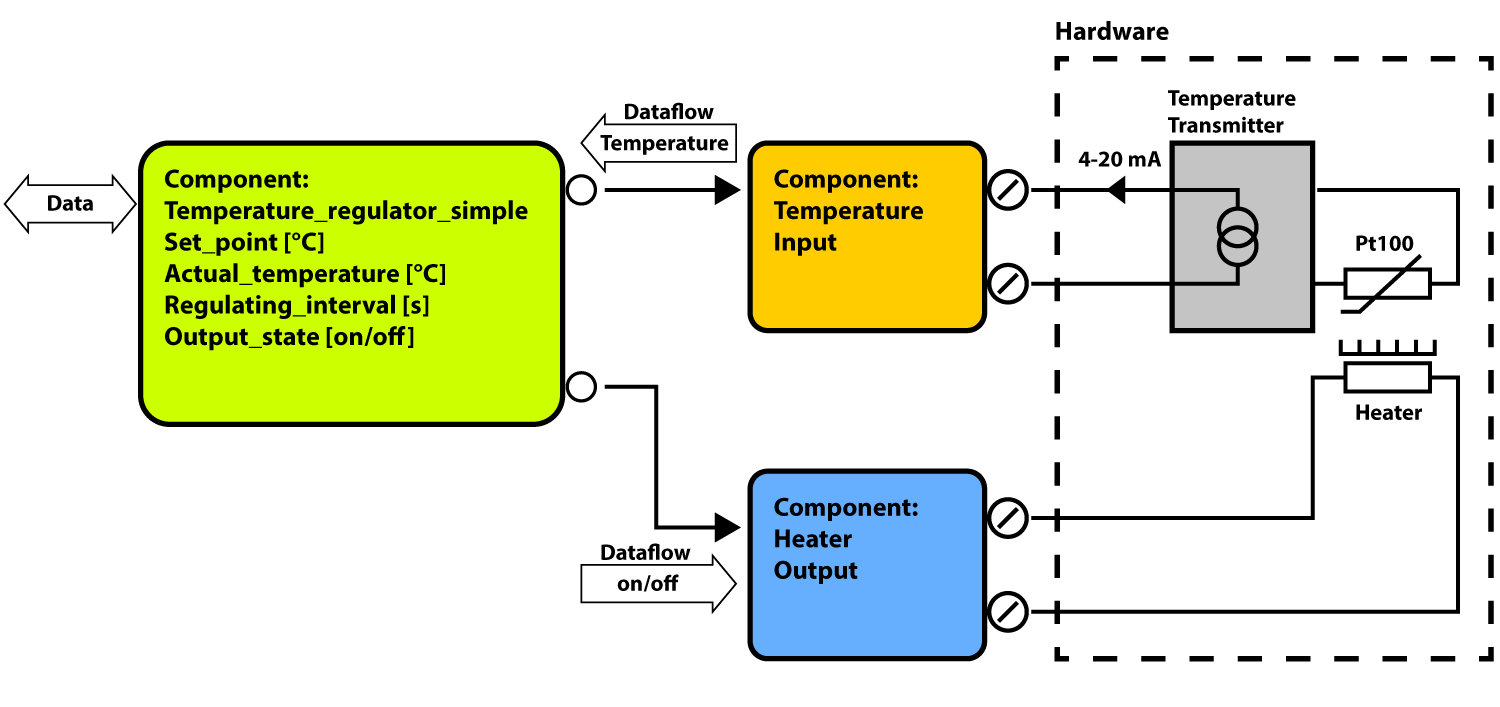
The first tutorial is to create a TEMPERATURE REGULATOR by connecting a number of components and the related visualization.
• A blue, already made digital output component to control the heating.
• An orange, already made 4 – 20 mA input component to read the temperature.
• And a green component to control the temperature regulation.
The regulator component must contain a temperature set-point and a regulating interval set-point.
The regulation is a simple ON-OFF controller.
When the temperature is below the set-point, the component enables the output, connected to the heating element.
When the temperature is above the set-point, the output turns off.
The regulating interval is controlled by a timer.
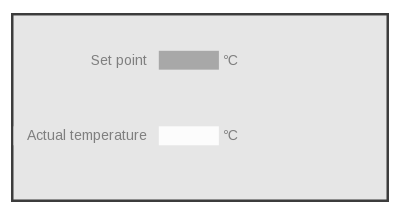
The visualization must show the current temperature and a set-point that can be changed by the operator.
–SEE THE HOW-TO VIDEO

COMPONENT
A component in VIGO6 is like an object in Object-oriented programming, with its own variables and methods containing program code.
The variables and methods are encapsulated and can only be accessed from other components if enabled.
Types are identified by a number called its GUID, which is a globally unique identifier.
Every type also has a title, such as “process component”.
However, titles may not be unique, so, in case of overlap, the GUID is necessary.
In this tutorial, the GUID is only mentioned here at the beginning, as there are no title- / name-coincidence in the types from PROCES-DATA you are to use.
The format is:
Company ID, underscore number, hyphen followed by a version number.
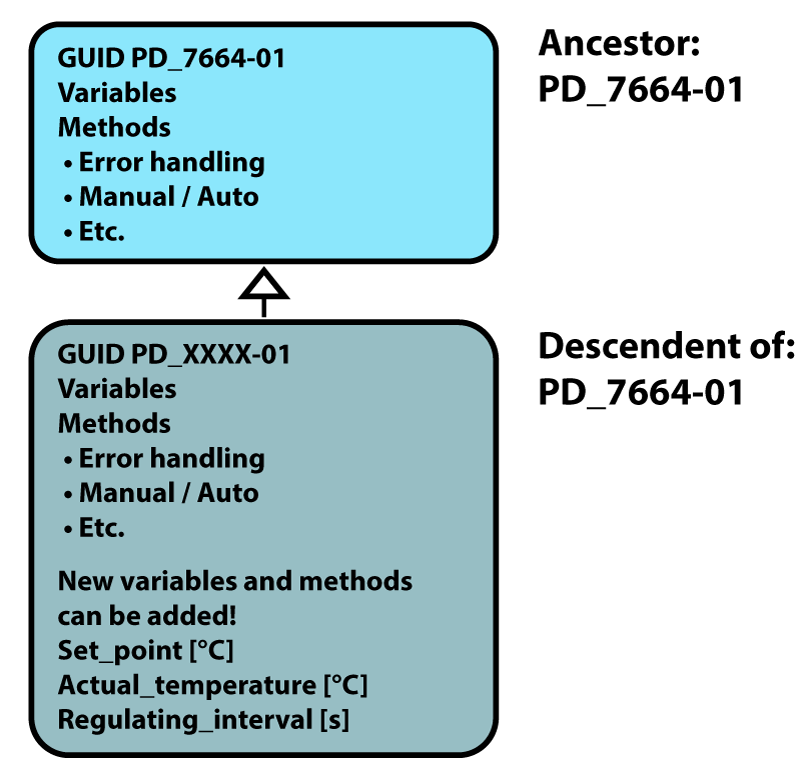
Example with a Process component: PD_7664-01
This component includes error handling, Manual or Auto etc.
A new component is created as a descendant of another component, called its ancestor.
The new descendent component automatically gets its own GUID.
This new component inherits all its ancestor’s features. They may be added to and expanded upon.
CREATE A TEMPERATURE REGULATOR COMPONENT
• First, open the ancestor component.
• Click on the “open” button (or press “CTRL O”) in the VIGO6 editor.
• Then select “COMPONENTS”.
• Open the PD_7664-47 in the Programmers catalogue by double clicking.
A component is found by typing any part of the GUID or title.
Our new Temperature regulating component will inherit all features from its ancestor.
• Right-click on the component title and then select “Create new descendant of type”.
A new tap will open with the new type, where you are the writer.
If you are not a registered user, the Writer is displayed as “Unknown”.
• Double-click on the titleof your component and change it to “Temperature regulator simple”.
Note: When you press space, you make an underscore
CREATE VARIABLES AND CONSTANTS IN YOUR COMPONENT
An instance constant holds a value, which the program can read but not write to.
Each instance of the component type may have an individual value assigned by the VIGO6 editor.
• Click on the plus of the component.
• Right-click on the section "INSTANCE CONSTANTS".
• Click on "Add constant".
• Select a data type. In this case the Float32.
It is a floating point format.
Observe the “D” icon, indicating it is Data.
• Change the name to Regulating_Interval.
• Right-click on the variable and select "Quantity type".
• Select Time Difference, which has the SI unit second.
A quantity is a real-world phenomenon, such as temperature, volume, or mass.
If a piece of data has a quantity, it must have a unit, such as Celsius, cubic metres, or kilograms.
Internally VIGO 6 works in SI Units, but the visualization can convert to other units, such as Fahrenheit, gallons, or pounds.
ADD A VOLATILE VARIABLE
A volatile variable loses its value during power down.
After power up it is set to an ‘Invalid’ value.
• Now Right-click on the section "VOLATILE VARIABLES".
• Click on "Add variable".
• Select Float32.
• Change the name to Actual temperature data.
• Right-click on the variable and press "Quantity type".
• Select Absolute Temperature.
The SI unit for temperature is Kelvin, but the temperature can be converted by the visualization to °C or Fahrenheit.
ADD A NON-VOLATILE VARIABLE
A non-volatile variable keeps its value after power up.
• Right-click on the section "NON-VOLATILE VARIABLES".
• Add a variable to hold the set point for the regulator.
• Click on "Add variable"
• Select Float32.
• Change the name to Set point data.
• Right-click on the variable and press "Quantity type".
• Select Absolute Temperature.
• In the right-hand side, set the default value to 25 °C.
Note: In the editor it is seen as Celcius, as the default local unit relation table is set by PROCES-DATA.
The local unit relation table converts SI units to the selected unit in views and in the code.
For example, the relation table could convert from Kelvin to Celcius or Fahrenheit, but by default it is Celcius.
It holds the set-point for the regulator.
Tutorial 1 - STEP 2
CONNECTIONS TO OTHER COMPONENTS
Your temperature regulator component will need to interface to the orange temperature input component and to the blue digital output component.
In this case two connectors are required. One for the temperature and one for the output.
A connector is used to communicate with other components.
The connector is created to be connected to a specific "interface", which can be a subcomponent-, component-, or device type.
Via this connector, the external interface can be accessed.
• Right-click on "Connections to external components".
• Add a connector to the component of type:
Digital output base, which is a basis for more output types.
• Rename it to Output.
To create a connection to a temperature component:
• Right-click on "Connections to external components"
• Add Connector to component of type: Temperature Input Base.
• Rename it to Temperature.
Please remark that naming is very important, to ease both the programming and readability now, and later on.
SEE THE HOW-TO VIDEO

REGISTER
The data in a component is encapsulated by default, meaning it is inaccessible to everything outside the component they belong to.
We can change this for our variables Set-point Data and Actual Temperature Data by using Register Subcomponents.
Then they can be used in visualization and other components.
This is done by adding a register and assigning it to the Set- point Data.
The same for the Actual Temperature Data.
ADD A REGISTER
• Right-click on the subcomponent section of your component and select add:
• Then double-click the type “Register”
• Change the name of the new register to Set-point.
The “R” icon indicates a Register.
The icon is red, until it is assigned data.
ASSIGN DATA TO THE REGISTER
The “D” icon in front of “Set point data” is light green until the data is assigned to a register.
• Right-click on the register and click: Assign data field to the register subcomponent.
• Select Set-point Data as the register variable.
Now the “D” icon has changed color to dark Green.
Also, the register icon turned grey, indicating that the register has a data field assigned to it.
Thus, the icons show useful information. However, they do not show which data fields and registers are connected, which can make more complex projects harder to grasp.
For this reason, good naming practices are important
Notice that the register and its assigned variable have the same name, except the variable has ”underscore” data added to its name.
This way it is easy to see the relation between a register and its assigned data.
THE VISUALIZATION NEEDS TO KNOW THE VALUE
Now, the visualization needs to know the value range.
This is used to calculate the number of digits to show.
The maximum value and the minimum value are set according to the possible values of the variable.
In this case the maximum value is set to 100 and the minimum value to zero.
The visualization is using Alarm limit high and Alarm limit low to indicate that the value is outside the accepted limits, by showing a red line around the digits.
The editor automatically adds the unit from your selected “local unit relation table” belonging to the selected quantity.
An operator has one or more functions in a company.
For each register it is defined which functions the operator are allowed to access and whether read and write are allowed by enabling Get and Set.
Default is Get and Set allowed for all functions. In this case, leave this unchanged.
ADD THE NEXT REGISTER
Then create another register with the name Actual temperature for the variable Actual Temperature Data.
• Right-click on the subcomponent section of your component and select add:
• Then double-click the type “Register”.
• Change the name of the new register to "Actual Temperature"
• Right-click on the register and click: "Assign data field to the register subcomponent".
• Select Actual Temperature Data as the register variable.
• Set the maximum value to 100 and the minimum value to zero.
• Set the alarm limit high to 40 and alarm limit low to 10.
• Enable "get" and disable "set" for all operator functions.
This tells the view that this variable is read-only, and nobody can change the data from the visualization.
The group of externally accessible data and methods is called an interface.
Enable "get" and disable "set" for all operator functions.
This tells the view that this variable is read-only, and nobody can change the data from the visualization.
The group of externally accessible data and methods is called an interface
ADD A TIMER
The regulation method must be called with a specified interval.
For this, a timer is used.
Add “Timer subcomponent” to the Subcomponent section.
The timer has an icon with an “I” inside, indicating an interface to the firmware.
More about that later on.
• Change the name to Timer.
• Click on the timer.
Read the usage for a Timer subcomponent, by selecting the methods and reading the documentation to the right of the VIGO 6 navigation tree.
Tutorial 1 - STEP 3
ADD A METHOD
Add a method and write your control code
Now you need to write the actual piece of code that will enable your component to make the wanted regulation.
SEE THE HOW-TO VIDEO

CREATE A NEW METHOD
• Right-click on the method section and select "Add Method".
• Name it Regulate.
• The icon of a method is an “M”.
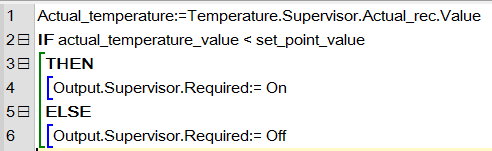
• Write code for your temperature control:
You can right-click and use "select identifier" and "code templates" instead of writing
all the code yourself.
Read the temperature from the input component into the data "Actual Temperature Data" in the control component.
Please note: If the set method of the register assigned to "Actual Temperature Data" is overridden, and some code is implemented here, this code is only called / executed if you write the temperature to the register “Actual temperature” instead of the data "Actual Temperature Data".
If the temperature is lower than the set-point, then set the output.
In all other cases clear the output.
REPEAT THE REGULATION
OVERWRITE
INTERVAL
The regulation must be kept running with specific intervals, and for this, you use the timer subcomponent that you added earlier.
The interval must be defined to 0.1 seconds, in the instance constant.
Insert your program
• Fold out the Timer subcomponent in your component and select the Timermethod.
• Right-click to ‘Override’ and open "Program".
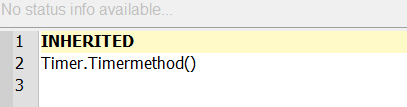
In the first line of the program, it says INHERITED, representing the method code of the ancestor.
Don’t delete the INHERITED, unless you know what happens in the code from the whole ancestor chain.
CREATE THE PROGRAM CODE
Calls the Regulate method you have made.
Calls the Run timermethod again, with instance constant Regulating Interval as parameter
This is what your code should look like.

INIT
You need to be sure that your system is in a known state before you start your regulation.
After power up, the init method in the methods section is called automatically.
The method Init() cannot perform any kind of communication with other components and is used for setting data values in the component.
Any initializing of component data must be done here to ensure mutex protection, so all data is set up before the component starts executing program.
Just after Init(), where the primary start-up is done for all components in the device, the method After Init() is automatically called.
This method may communicate externally (via a connector).
It is very important to remark that external access to my component or starting a method asynchronously may cause the After init() method, to not be the very first method called, after the Init() method has executed.
Override this method to set an output in a specific state as an example.
You have to add your code to the init program:
• ‘Override’ the After Init method in your Temperature Regulator Simple component.
• Call the Timermethod after ‘Inherited’
This is what your code should look like:
Tutorial 1 - STEP 4
VISUALIZATION
Data in a component can be visualized, but only data assigned to a register or GET SET methods, where you checked the box “Allow access to register and methods marked with external access”.
The Temperature Set-point and Actual Temperature in your component are already accessible from other components.
A view is a visualization element. It is composed of basic elements and other views, and other views can use it as an element.
They are associated with a component or assembly, such that view types can be re-used.
Let us make a simple view of our temperature regulator component.
Just as a new component type is always based on some ancestor, we do not want to build every new view from nothing.
So when we create a view, it is based on an existing visualization associated with your component, or an ancestor of your component.
As the visualization must know the interface of your component, creating a visualization is different to creating a descendant.
SEE THE HOW-TO VIDEO

CREATE A VIEW OF THE TEMPERATURE REGULATOR COMPONENT
Your component should be able to view and change the set-point and to view the current temperature.
• Open your control component Temperature Regulator Simple.
A view is created as a descendant of another already existing view, in the same way as you created your component.
• Right-click and pick “Create new view for this type based on” – “Comp view”.
Every view is created to visualize a specific type, and only works for this type (and for its descendants).
This type is called a view’s For-type.
By choosing the view ancestor in your component, the new view will automatically get your component as For-type.
• Rename the view to “Window for temperature regulator simple”.
When naming a view type, please observe our naming convention:
A “Window” is a place where other view elements are shown and allow the user to navigate.
A “Button” can be clicked by the user, to manipulate or show some data.
A “Show” can be clicked by the user to open another window.
A “Swipe” is a window, where different “Frames” are collected and can be swiped between.
You do not need to use the same naming, but for your own sake, select a naming convention, and stick to it.
It will be of great help, when many new GUIDs are created.
• Now, save your view.
• Open your graphical editor by pressing the “Show view”- icon seen to the right.
It is just above the VIGO6 navigation tree and looks like a play button.
Top left and bottom right.

Adjust the view size.
To do this;
• Right-click on the shown view, and adjust the view size here.
• Set bottomRight y to 50 mm and x to 100 mm.
• Add the values to show.
• Right-click on the view list and pick “add” – “view for control instance”.
• Click on the plus sign next to ”Temperature Regulator Simple”.
This selects how the data assigned to the register is represented in the view.
On your view, you now see the element and you can drag it where you want on the screen.
• Add a similar view for the register “Actual Temperature”.
Your view should look like this:
Finally, you have created your control component with control logic and a view.
LET’S SUMMERIZE
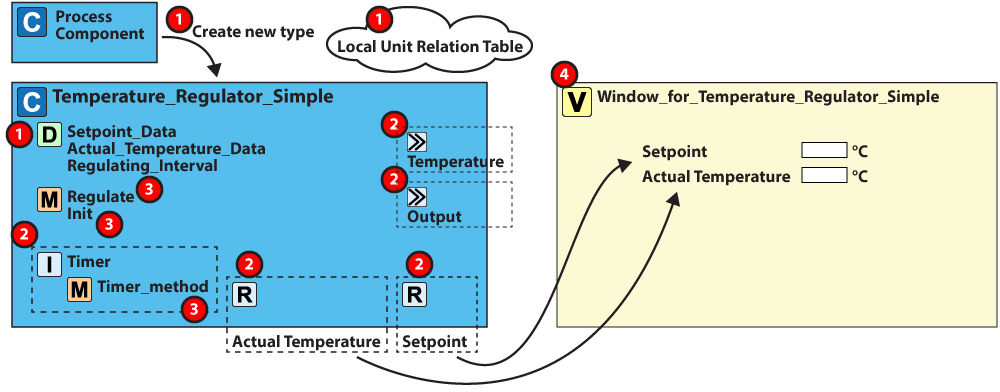
And to recap, here’s what you’ve built:
The numbers on the illustration below correspond to the steps that we have just gone through.
Now let us move to the next tutorial where you learn how to create assemblies,
main assemblies, and projects.
And you will set up your testbed and load your components into a hardware module.

